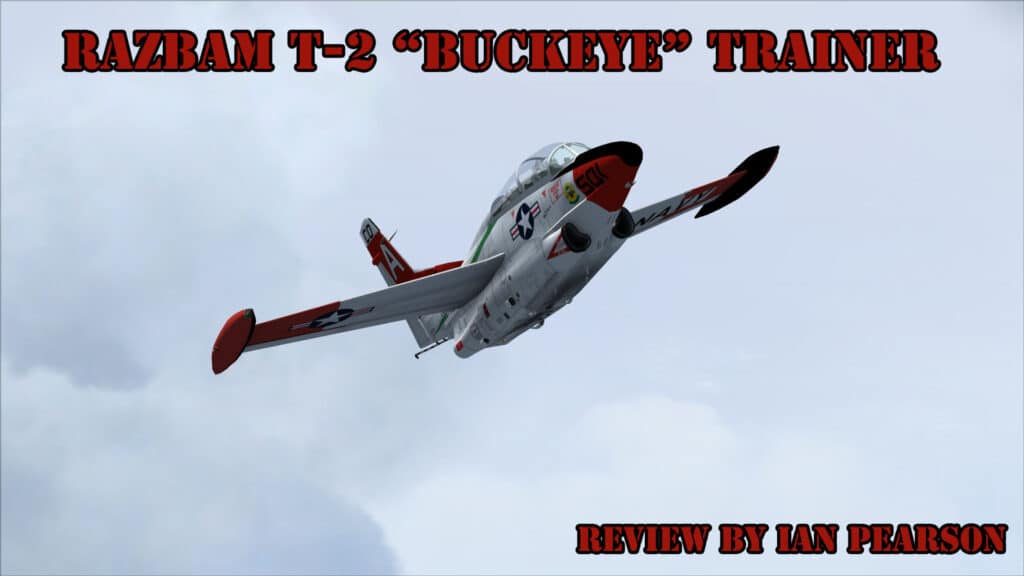

 The North American (later Rockwell) T-2 Buckeye is one of those aircraft whose beauty is definitely in the eye of the beholder.
Definitely a child of its time and role, the T-2 formed the backbone of US Naval jet training through at least three generations of combat aircraft, with examples remaining in USN service up until very recently, even though the production line was opened in 1958 and closed in 1976. The US Navy were not the only user, however, and the aircraft also served in a training and light attack role with both Greek and Venezuelan Armed Forces.
Replaced (eventually!) in USN service by the BAE/Boeing T-45 Goshawk, the Buckeye was, however, the first taste of carrier jet flying for a number of generations of naval aviators and as such is worthy of a place in aviation history.
As already mentioned, not only was the type used to introduce pilots to jet and carrier deck operations, but it was also fitted to carry limited weapon loads, appropriate to its era of service. You won’t be seeing modern laser-guided bombs or anti-tank guided missiles fitted under a Buckeye’s wings, but it was more than capable of putting aerial rockets or a “dumb” bomb onto a target.
This isn’t RAZBAM’s first visit to the T-2 model – a Microsoft FS2004 version preceeded it, although that no longer seems to be available for sale. This new model is a complete rebuild for Microsoft Flight Simulator X, though, and has, amongst other things, already featured in the promotional videos for another company’s package.
As with RAZBAM’s other recent releases, however, it tends to be more than just another visual model to add to your hangar, so it’s definitely worth taking a closer look at.

Installation
The aircraft is delivered from simMarket as a 352Mb zip file, which in turn contains the install executable, which is also, strangely, 352Mb. While this little arrangement doesn’t entirely make sense at first glance, it apparently gets around the issues that some people have when downloading executable files, only to be told by newer versions of Windows that it Came From The Internet and as such is a Security Risk And Must Not Be Run on pain of… being told off by Windows?
 Anyway, after being unzipped, the installer is a very typical executable type which simply asks you to accept a single page EULA, confirm your FSX path, then installs. It couldn’t be more simple from a user standpoint and, after installation, you will find yourself back to the desktop, but with a number of new folders in FSX and a RAZBAM entry in your Windows “Start” menu, which contains direct links to the manual and a paint kit.
if you wish to find these manually, they are contained within your FSX installation folder, in a the ../RAZBAM/manuals and ../RAZBAM/Paint Kits subfolders. Your Simobjects/Airplanes folder will now also contain four additional subfolders, containing the T-2B, T-2C, T-2D&E plus the T-2J-1S aircraft respectively.
Althogether, the addon takes up around 2.2Gb of hard drive space, the vast majority of which is aircraft textures.
Uninstallation can be run directly from the FS folder using the slightly unintuitively named “unins004.exe” file, on my installation, or it can be done through Windows Control Panel, which will always be the preferred method anyway.

Documentation
At this point in the review, I have a slight conflict of interest to declare, in that if you find any typos or grammatical errors in the manual, they are at least partially my fault. I got a Skype message, rather late at night, asking me to proof read a PDF document for someone, which turned out to be that for this product. I didn’t check the actual content of the manual was correct, as I didn’t have the aircraft to do so, but if there are any English language errors in there then I apologise. In my defence, though, two o’clock in the morning is not the best time to be proof reading a document for a package due out the next day! As it turned out, release was delayed and I should possibly have put off the proof reading until the next morning!
 Now I do have the package to look at the manual alongside, however, the 45-page PDF is for the most part very useful and well done, covering each section of the aircraft panel in detail. It shows exactly how to operate each panel component using text alongside images and also details operating limits for both the engine and airframe weights. What is noticably missing, however, is any form of checklists, procedures or operating speed guidelines for normal flight.
Although I didn’t experience any issues flying the jet, the lack of V speeds, stall speeds, etc. is a pity and makes testing against expected numbers very difficult. Thankfully, from a checklist perspective, there are aide memoir placards inside the cockpit for both Takeoff and Landing.

Exterior
However ‘into’ aircraft the reader is, I doubt anyone will disagree with me when I say that the T-2 is never going to be winning any beauty contests.
 Like most of the aircraft selected by the USN at the time, the design of the jet is very functional. It’s streamlined, yes, but straight wings keep the speed down (and stability up for new pilots…) and the power plants being kept close to the centreline increase the chances of survival considerably in the twin-jets should one fail – a far from uncommon occurrence in the 1960s.
RAZBAM’s modellers have captured the shape of the aircraft well, according to all the reference material I looked at, and the aircraft holds up well to scrutiny both in terms of the model mesh and texturing, which comes in the form of 2048×2048 DDS files with bump and spec maps. The textures have been done well, with warning and information placards visible and readable, while not massively stretching the capabilities of the average FSX PC. I noticed no real FPS drop at any time when using this package and only once, when taking screenshots with all FSX scenery sliders set to maximum, did I have to wait for my system to draw textures.
 There are a number of different variants of the T-2 airframe included, from the single engined T-2J-1S (T-2A) prototype and early versions, onto twin jets with the T-2B and T-2C and finally to the weapons capable T-2D of the Venezuelan military and T-2E of the Hellenic Air Force. I’ll talk in detail about the package’s weapons fit later, but the models are “dynamic”, allowing loads to be changed inside the sim without reloading the aircraft and, when expended, ordinance leaves the aircraft and falls/flies away. There are no tie-downs, chocks or flags placed when the aircraft is shut down, but the pilot will be removed with the jet cold and dark plus the parking brake applied.
Fifteen textures are included, comprising five T-2J-1S schemes, two T-2Bs, five T-2Cs, two T-2Ds and a single T-2E. Most of the paint schemes are US Navy hi-visibility red or orange, so are fairly similar, with three aircraft wearing camouflage paint.
 In terms of animations, the exterior model has exactly what you’d expect; the control surfaces, flaps, gear, tailhook and spoilers all move smoothly and look “connected” to the aircraft. One nice little detail is the landing light that drops down out of the nose when turned on and retracts when turned off. The turbine blades, situated deep within the aircraft, are also visible and animated. The pilot figure is animated as well.
With the engines running, there is a visible smoke effect that follows the aircraft, which is appropriate for the engines used. While it looks good in the air – visible but not looking like a fire – the effect suffers a little from FSX limitations when stationary at a hold or similar and it appears apparently at random around the aircraft, which can cause it to flicker, particularly when viewed against the ground textures.
I can find nothing to complain about at all when looking at the exterior of the aircraft. The model is very nice, the textures are very nice and a .psd (Photoshop) format paint kit is included for those that want more or personalised ones. The animations appear spot on. There probably could be more, but it would just be eye-candy, not necessary to operate the aircraft.

Interior
When it comes to panels and gauges, all of the models are flown solely from the VC, with only two pop-up 2d panels for functions that would normally be carried out on the ground, pre-flight – altering the radio pre-sets and adding a load to the aircraft as previously discussed. Both of these 2d panels are only active when the aircraft is powered down on the ground. One thing about them that I probably should mention is that they are “stretched” on a widescreen monitor (I run 1920×1080) and appear slightly distorted as a result.
 Other than that, the gauges are with very few exceptions built into and animated within the model, rather than flat 2d “.gau” style gauges. Although there are instances (such as CRT/TFT screens and reflector gunsights, for instance) where 3d gauges cannot be used, there are a number of advantages to coding the gauges into the aircraft model and this package does it well. The gauges look “set into” the panel rather than “sitting on” the panel texture – because they are – which gives a greater visual fidelity to the real world and it also means that often settings can be made with greater precision as modelled gauges can have much finer accuracy, provided the code behind them allows it, than textured gauges.
Both front and rear seat positions are modelled with full panels appropriate to the position and aircraft that they sit within. Although all the aircraft included in the package have similar systems, there are differences beyond the simple single versus dual engine panels and these are recreated here.
 While mentioning systems, this is a good time to discuss them, as although comparatively simple to start, fly and shut down, the RAZBAM T-2 package includes a significant amount of system depth too – most of which will require you to learn how to use them as they are different from the defaults.
A good example of this is the radio and navigation system for the Buckeye which, as with most military aircraft of its era, uses TACAN rather than VOR beacons in addition to NDB/ADF. Unlike a VOR, which is set by dialling in the frequency of the transmitter, TACAN uses a system of channel numbers to represent frequencies. To quote the two written on my noticeboard that I use to calculate others, 117.30MHz is TACAN channel 120X and 113.30MHz is TACAN channel 80X. TACAN uses two ranges of channels, X (xxx.x0MHz) and Y (xxx.x5MHz), but only X Channel frequencies can be received in the RAZBAM package – which I’ll come to shortly.
 Thankfully, RAZBAM have thoughtfully provided a ‘cheat sheet’ for conversion from MHz frquency to TACAN channel. It appears as a kneeboard if you click on the cover of the map case, to the left of the pilot’s seat, providing an instant look up table and allowing you to make the conversion and enter it. There is, however, a limitation still. In Flight Simulator X, the TACAN system is represented as DME only stations, which is how they appear to a VOR/DME receiver, such as those fitted to civilian aircraft. To test whether the T-6 could receive these, I planned a quick test flight around the UK from Coltishall (TACAN 112) to Marham (TACAN 24) and down to Lakenheath (TACAN 39). Unfortunately none of these were received for more than a DME indication on the Bearing-Heading-Distance Indicator (BHDI) with the TACAN Course Indicator (TCI) remaining resolutely centred regardless of setting. Having discovered this limitation, I tried to confirm that the system worked using Clacton VOR, only to realise that 114.55 is a “Y” frequency, not an “X” frequency, so I was completely stymied. After a fair bit of hunting around the map, due to all the nearby VORs being xxx.x5, I eventually ended up flying quite a way Northwest to find Daventry VOR (115.70 = TACAN 104X) and confirm that the system worked perfectly when given an appropriate beacon to track. The downside of this is that rather than landing amongst the USAF aircraft at RAF Lakenheath, I ended up parking next to a Ryanair B737 at East Midlands International Airport!
 There’s always a balance to be struck between modern convenience and actual aircraft accuracy when simulating this type of aircraft and RAZBAM have swung a little between the two – for instance adding an ILS function to the FSX aircraft that the real one didn’t have, while retaining the 20 present frequencies limitation of the real aircraft’s comms and NDB radio set (although these can be overridden using hidden functionality).
Getting away from the panels at last and simply looking around, the texturing and modelling standard of the interiors is very good. There are no apparent untextured components or “stretched” textures, all text is readable, most things can be clicked, poked and prodded, mostly doing something as well. There are a few exceptions to this such as the checklists on the glareshield wanting you to set the Ejection Selector, which is modelled and labelled on the sidewall below the canopy, but not clickable. Oh, and no, you can’t eject from the aircraft, sorry! To aid with weapon use, discussed shortly, there’s a “declutter” switch as well, which disposes of the stick and throttles, allowing you to see controls behind them.

Flying
The best way to sum up flying this model is “easy”. It’s a very docile, very easy to control, flight model which doesn’t have any tendency to bite you unless you really provoke it to.
 Taxying requires a small amount of power to get the aircraft moving, with the throttle then closed to maintain the taxi. Speed increases only slowly with the throttle closed, meaning that it is easily controlled using occasional brake pressure and turning at a sensible speed is, again, straight forward and undramatic. if you go too fast into a turn, however, the aircraft will “understeer” and move on its suspension.
Yaw control on the takeoff roll is, once again, simple, with the aircraft tracking straight down the centreline in zero wind conditions. Gentle back pressure above 80KIAS with a clean aircraft and full fuel load will lift the nose and the aircraft will leave the ground at around 100KIAS, although as previously discussed, no recommended V speeds are given and a slightly higher speed would probably be recommended – I normally left the runway at around 120KIAS during testing.
Once off the ground, with wheels retracted, the aircraft will accelerate quickly using the documented 96.8% maximum continuous RPM (you’ll need to use the tooltips to set this, probably), climbing easily at between 250 and 300KIAS until above 20,000’AMSL, although you do have to watch as you get higher, because vertical speed tails off quite quickly above 20,000′. The highest altitude the aircraft was cruised at during testing was 23,000′ It could have gone higher, although I didn’t test the service ceiling.
 I should probably mention at this point that, in spite of numerous warnings about temperature and time limits for engine settings, nothing happens, immediately at least, should these be exceeded. During testing, the T-2B was operated with the throttle wide open from takeoff, giving exhaust temperatures around 800 and with approximately 100% RPM for well over five minutes. I got bored of streaking over the open ocean at Vne and backed off, turning back towards land. Likewise, exceeding the Vne “pole” on the Airspeed Indicator won’t do a lot either – until you overstress the aircraft and FSX lets you know about it, if you have crash detection turned on.
At the other end of the airspeed spectrum, stalling the aircraft resulted in the following results:
Clean airframe: stall warning sounds at 95KIAS with stall immediately after. Nose needed to be held VERY high to achieve stall and the aircraft wallows down nose high. Control authority is retained throughout the stall and releasing controls recovers to a steep dive. By the time the stall is actually reached, no further up elevator trim is available and the throttle needs to be held closed with the stick held fully back. This is not an easy aircraft to stall!
Approach configuration: Stall warning sounds at 85KIAS, again with stall immediately afterwards. The nose drops to a lower pitch in the stalled state, but otherwise results were the same as clean configuration. The stall happens much faster due to the much higher drag and more height is lost during recovery. The aircraft is far easier to stall in approach configuration.
In spite of numerous attempts, no spin was achieved, with all situations resulting in a spiral dive at increasing airspeed.
Finally, I’ll talk about the aircraft’s approach characteristics, which are, in summary, very appropriate for an aircraft of its vintage.
 Again, due to the lack of advice on checklists or reference cards, the only information available to determine an approach airspeed are a warning on the panel that the gear should not be operated above 165 knots and the aforementioned and tested stall speeds. Thankfully, being a fast jet and a naval one at that, all the variants of the T-6 included are equipped with angle of attack indications. Provided you keep the yellow light lit to the left of the forward windscreen (green is slow and/or nose high, red is fast and/or nose low) and the meatball, ILS needles or runway where you would expect them to be, you’ll be fine. Depending on the approach configuration and angle, I usually flew approaches at between 130 and 140KIAS, which with full flap and the gear down requires a surprising amount of power to maintain a 3 degree glideslope.
 There is a “gotcha” though, which is common to all aircraft of this vintage and even still some modern ones: You cannot push the throttle around and expect an immediate response. The twin turbojets fitted to the T-6B and later take time to spool up and longer again for the aircraft to respond to the increased power. Closing the throttle entirely is usually a bad idea as this takes a long time to recover from when you need power back. Therefore it’s always best to keep the throttle partially open giving you room to use the engine as an aid to recover should the approach picture change. If you’re low, slow and have the throttle closed, you’re going in short, whatever you do. Keep power on and you’ll stand a chance of recovery, so thankfully the aircraft has large and effective speedbrakes to help you slow down.
 One nice thing about the aircraft’s stability and my already knowing that you need to keep power on with old turbojets was that the first approach I flew to an aircraft carrier, using AICarriers to set one up heading directly into a 12kt wind, was a success. It wasn’t perfect, I think I caught the 2 wire, but considering how long it has been since I flew a carrier approach in FSX before testing this aircraft, I had expected at least a few missed approaches, probably a few crashes, before I got it right. Nope. First time, the aircaft plomped onto the deck with minimum fuss and I was able to taxi straight across and launch again. Second approach was actually worse, but I still got it down. So, this is a good carrier landings trainer then!
All in all, although the lack of given figures and advice makes it hard to judge how well the aircraft performs compared to its real world counterpart, flying the RAZBAM T-6 in any guise is great fun.

Bombs away!
I’ve mentioned several times already than the RAZBAM T-6 package has the ability, the same as most of its recent brethren, to carry and use a number of appropriate ordinance types in the sim.
 In the case of the Buckeye, due to its vintage and role, the array of weaponry available is limited to gun pods, rockets and bombs. Depending on the exact model, some aircraft can carry more of a range than others, with the full set only available to the Venezuelan T-2D and Greek T-2E variants, while USN/USMC aircraft can only carry practice munitions.
The weapons system comprises a number of different components; you will need to assign a button to drop them (not the usual one, either… it’s the seat belt signs toggle switch), load ordinance using the 2d panel and then use it through the aircraft’s virtual cockpit. The different variants have slightly differing methods of arming and deploying the weapons carried, but these are clearly explained in the manual, with a step-by-step guide to using them on the different panels.
 Being British (and having checked out some Venezuelan airbases, which all seem to be in craters in FSX), I decided to do what the British military do best and blow up a Scottish island to test the system out, so loading up the camo T-2D at Lossiemouth, I shut the aircraft down from its default engines running state and loaded Mk.82 BBs on stations 1 and 6, Zuni 4-packs on stations 2 and 5, settling for .50cal M2HB gun pods on the final inner hardpoints, 3 and 4. The aircraft visibly settled on its haunches as each weapon was loaded, rising and falling on its suspension as I added and removed the weight.
Having previously selected an island to use as a target, I took off and turned north, heading out over Wick and actually missing my island before turning back and lining up for a bomb pass: Sights on, Master Arm on, bombs selected, pairs selected, nose and tail fusing selected, line up on target peninsular, enter shallow dive, press trigger and… nothing happened.
 Pulling out of the dive, I consulted the manual and discovered that only the upper half of the release selection, for single weapon release, is usable with bombs, while the lower half, pairs, is for use with rockets. Rather than reset the release selector, I switched from bombs to rockets, lined up on another peninsular and fired. Eight white streaks shot out in front of the aircraft in pairs, two hitting the water short, two hitting the peninsular and two long into the water belong. Each gave out a puff of white smoke where it hit, rather than an explosion. Selecting the two bombs, I went for the same peninsular and released one each in two passes. Again there wasn’t an explosion, the impacts being marked by a puff of smoke more suited to a practice munition (or a flourbomb) than a 500lb bomb, so finally I selected guns, made a final couple of strafing runs and secured the aircraft’s armaments panel before returning to land.
After the detonations of the bombs dropped by the earlier RAZBAM A-6 package, I was hoping for something a little more impressive from the weapons, but the use of them – considering I was in Free Flight and not a mission – was appropriate to the training role of the aircraft. The weapons system, once set up properly, worked perfectly and definitely added to the package.


Conclusion
The RAZBAM T-2 Buckeye package sets out to provide more than your average add-on aircraft does and it delivers it with style, but not without a few reservations as well.
For me, like I suspect the vast majority of the potential user base for these aircraft, the downsides of the package are comparatively minor and can be easily ignored, which gives the user plenty of scope for screaming around valleys, shooting approaches to carrier decks before launching off them again and putting practice munitions onto training targets.
Given the price point that the package has been released at, the lack of things like absolutely every switch being clickable or a full and complete “consequences” package for exceeding limits are more than excusable. This is intended as a fun aircraft to operate, while providing an idea of the limitations of the real-world jet, not a systems trainer. The missing checklists and reference documentation is less excusable and would have been really quite useful.
I really think the RAZBAM team has succeeded in what they have set out to do with the T-2 package. It’s a fantastic little fun jet to fly, but gives you sufficient challenge to keep your attention as well. It’s well worth adding to your collection.

Ratings and Information:
Installer: Very good, simple to use.
Documentation: Very good for panel and systems, but lacking operational information and checklists.
Modelling: Very good.
Textures: Very good, DDS + bump +spec
Flight Model: Unable to test to accurate specification. Appears very good.
Extras: Adobe Photoshop format paint kit.
Download Size: FSX 352Mb Installation size: 2.2Gb
Price: EUR 22.95 without VAT
Developer Homepage: http://www.razbamsims.com/
Link: http://secure.simmarket.com/razbam-t-2-buckeye.phtml
Test System: Intel i7 920 OC @ 3.0 Ghz, 6 Gb RAM, nVidia GTX285 w/1.0 Gb video, Win 7 Home Premium 64, FSX w/Acceleration.
Additional Information: USS Nimitz Aircraft carrier by Javier Fernandez, available at Avsim, used with AICarriers by Lamont Clark, also available at Avsim. Weather generated by ActiveSky Evolution.
![SimWorks Studios - Kodiak 100 Amphibian MSFS [Trailer] Release Date Announced](https://www.simflight.com/wp-content/uploads/2022/10/SWS_Kodiak100_thumb-1024x576.jpg)

0 Responses
Hi Ian P,
Thank you very much for your nice review,
Greetings
Matthias from the Netherlands
Thanks Matthias.